.jpg)


Gear Mod RPM Increase
03/06/10 The first project I tackled was trying to boost the rpms of the stock mill from
it's max of 2250. The easiest way seemed to be just swapping the motor and intermediate gear. Unfortunately the shafts are different sizes, 10mm for the motor and 15mm for the intermediate shaft. I looked for some commercially available gears with the correct bores and the same no. of teeth but no luck. The motor gear is 20T and the Inter gear is 37T.
A direct swap would have given an output of about 7700 rpm which would be WAY too fast
for the bearings to handle anyway.
I went with (2) 36 tooth gears from qtcgears.com part # KSS1-36. One fit the motor already with it's 10mm bore but the Inter had to be opened up to 15mm. The motor gear had to have .125 faced off the flange and the Inter gear to a .200 thick flange. Setscrew holes added to both, keyways would be best if you could manage.
Max rpm was 4700 with this gear mod. The stock bearings are only good for about 4000 though so an upgrade to A/C bearings would be wise.

|
|
Old vs. New
|
|

|
|
New Gears Modified
|
|

|
|
Install The Motor gear
|
|

|
|
Install the Inter Gear
|
|

|
|
Install the Inter Gear 2
|
|
Motor / Controller Replacement Options
Grizzly has had some motor and controller issues arise after the July 2010 shipments
of the G0704. A handful of Cnczone members have reported that their motors and/or controllers have burnt, smoked or overheated over the past several months, some almost out of the box. Grizzly replaced any bad motors or controllers since they are under warranty. Grizzly delayed their next shipments due to this problem but are back to delivering the mills. They don't seem to have completly fixed the problem or are just playing it safe, but the new mills come with a warning.
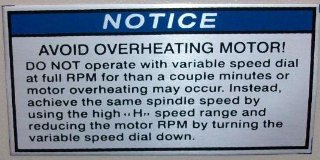
The problems don't seem to be related to any mills delivered before July 2010, mine has worked flawlessly. There have been a couple similar problems with the PM25MV mill from Precision Mathews early on even though it uses a different motor and controller.
Chalk it up to growing pains. I'm sure they will get it staightened out and all will be well.
In the event your're unlucky enough to have the same woes and don't want to wait on replacements or maybe you're just like me and looking for an upgrade, I'll list several alternatives here that will give the same or better performance from the mill. Most will require some modding to get them attached and running. After folks start doing the upgrades, I'll provide links and pics to completed motor/controller swaps. For right now they are mostly ideas of what could be done.
Motors
1. Buy a replacement from Grizzly if your warranty expires.
Motor (#221) http://www.grizzly.com/products/G0704/parts/2 $71.25
2. Adapt an X3 motor, should be pretty similar in size and power to the original.
Grizzly (#224) http://www.grizzly.com/products/G0463/parts/1 $215.50
LMS (#3381) http://www.littlemachineshop.com $252.81
3. Swap in a treadmill motor, a popular choice for X2's and others. They can be found all
over Ebay for less that $70, give great RPM and power. I have a Nordic Track motor
installed on my mill and it works really well. Read more here.
Couple it with the KBMM-125 controller, # 4 below under Controllers.
Treadmill Doctor - New and Rebuilt Motors
4. Replace both with a VFD and 3 Phase Motor. Another popular choice for many mill
owners. You get lots of power and complete variable speed control that can easily be
interfaced with Mach 3 for CNC spindle control. Available in 220 Volt versions
that don't cost that much especially if you can find a deal on a motor on Ebay or a
Surplus Outlet. RPM can be more than speced, read recommended max.
Drives
Automation Direct GS2-22P0, 2 HP 220 VAC $251.00
Automation Direct GS3-22P0, 2 HP 220 VAC Sensorless Vector $293.00
Teco Model FM50-202-C, 2 HP 220 VAC $144.00
Teco Model JNEV-202-H1 2 HP 220 VAC Sensorless Vector $177.00
Motors
Automation Direct MTR-1P5-3BD36, 1.5 HP 3-Phase, 3600 RPM (5400 Max). $114
Automation Direct MTR-002-3BD36, 2 HP 3-Phase, 3600 RPM (5400 Max). $127
Automation Direct E2003, 1.5 HP 3-Ph, 3600 RPM (7200 Max), Inverter Duty. $398
Automation Direct E2006, 2 HP 3-Ph, 3600 RPM (7200 Max), Inverter Duty. $441
More suited to mills the size of RF45's or bigger they can mounted on the G0704.
Note : This is a huge motor as you can see. we'll keep looking for a
smaller one. rcazwillis has installed a 1.5hp 56C motor on cnczone.
Mad_Welder on Cnczone also has a 56C motor on his BF20.
5. Replace both with a BLDC package from Keling/ATech. They had a couple bugs with
the circuit boards and made new ones but they still don't seem to work very well.
The 1.5 HP should be well suited for the G0704.
KL-1160_BLM Brushless Motor 1100W (1.5HP) / 6000RPM $219.95
KL-1160_BLM Brushless Motor Driver kit $209.95
6. Replace both with an RC Brushless Motor and Driver. There have been some people
do this swap on Sherlines and Taigs but haven't seen one on a mill the size of the
G0704 yet. They seem to have plenty of power and RPM for such a small motor,
could at least be considered a good option for a High Speed attachment. This thread
on Cnczone has some good links to suppliers and reviews of them. Cost seems to
be around $100 - $200 for both for a large high amp motor and controller.
Hobbypartz - one of the many RC stores with motors and controllers.
Note: I'm working on adding a brushless RC motor from Hobbyking, stay tuned.
7. Replace both with a large servo motor and driver, cost can be pretty low if you find a
deal on Ebay or Surplus. You can also spend a lot for new but with an encoder, you
could have feedback for spindle orientation with an ATC like the big boys.
yantra3d on cnczone found a good deal on Ebay for his X3.
8. Use a simple 1-Phase AC motor and a belt drive for basic on/off spindle speeds
like on a Taig or drill press, not great but will get you going to make chips.
You'd get 2 speeds using the Hi/Low selector.
3400 RPM 1 HP 120 VDC PM MOTOR from Surplus Center, can be used as AC too.
2 HP SPL. 120 VAC 3450 RPM COMPRESSOR MOTOR
9. Get a 1.1Kw (1.5 Hp) DC motor for a WMD30V/WMD30LV mill from Weiss Machinery
in China. I contacted them by email on their site and they were very helpful. I paid
$220 total with airmail shipping to my front door and had it in 5 days (including the
weekend). They were willing to take payment by Paypal thru their partner Rexx
Machine. See my video and read more here.
Update: From a recent customer, tell Weiss you want this motor
part no. of 108ZYT-006L is #235, WEISS code number is: 38014243
10. If you want really high rpm, consider adding an auxillary spindle mounted on the side
of the head. There are many options for this including laminate trimmers
(like my Dewalt), Proxxon, etc. A great option is a water cooled spindle with ER11.
They can hold up to 1/4 inch shank tools and reach 24000 rpm controlled by VFD.
Controllers
1. Buy a replacement from Grizzly if your warranty expires.
Controller (#78) http://www.grizzly.com/products/G0704/parts/1 $63.25
2. Replace the controller with a KBIC 125 board which the original seems to be copied.
KBIC-125 http://www.galco.com Add a HP resistor and a heatsink. $100.91
Read the manual.
3. Replace the controller with a treadmill speed control. I've used one on my X2 for years
now without trouble. You can still find some on Ebay.
Treadmill Doctor
4. Recommended for the 1100 Watt motor, use a KBMM-125 controller with a 1.5 HP
resistor (#9850), (2) 25 amp fuses and heatsink. Get them all at Galco.com for
around $130.00.
G0704 Motor Controller RPM and Torque Increase
Hogging Capabilities
HSM High Speed Milling Capabilities
Drawbar Wrenches
Oldham Couplers
|
|
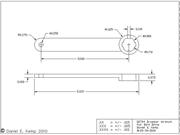
G0704 Drawbar Wrench for belt drive
|
|
|
|
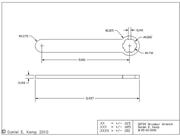
G0704 Drawbar Wrench
|
|
|
|
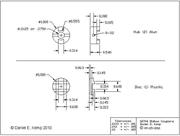
G0704 Oldham Couplers
|
|
Mach 3 Spindle Control
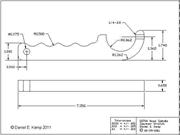
Spindle Spanner Wrench
|
|
G0704 Hoss spindle spanner wrench
|
|
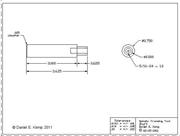
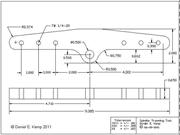
Spindle Tramming Tool
|
|
spindle tramming tool shaft
|
|
|
|
spindle tramming tool
|
|
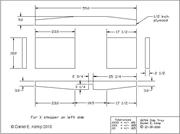
Chip Tray and Mini Temp Enclosure
|
|
g0704 chip tray
|
|
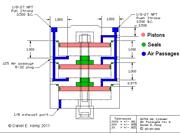
High Tension Power Drawbar
|
|
G0704 air cylinder air passages rev b colored2_cnv
|
|
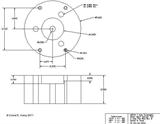
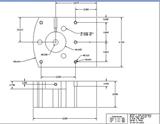
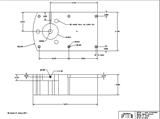
Travel Increases
Y Axis up to 9.5 inches, Z Axis up to 18 inches
|
|
G0704 Y axis extension basic head spacer for z axis flip mod rev B
|
|
|
|
G0704 Y axis extension basic head spacer for z axis flip mod
|
|
|
|
G0704 Y axis extension basic head spacer
|
|
|
|
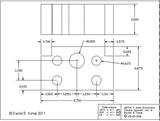
G0704 Y axis extension column spacer rev b
|
|
|
|
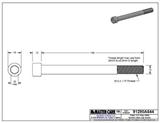
mcmaster column bolts
|
|
|
|
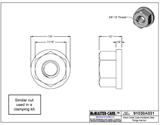
mcmaster flange nuts for head
|
|
|
|
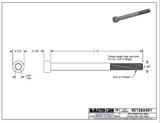
mcmaster head spacer screws
|
|
|
|
mcmaster tbolt
|
|
MAD - Manual Auto Drawbar
|
|
G0704 Manual Auto Drawbar
|
|
You can buy a pin spanner wrench from Wholesale Tool - size 1 3/4 - Order Number: 6418-0150
They also carry many sizes at your local Sears or hardware stores.
Repacking Roton Ballnut
Replacing the ball bearings in the Roton ballnuts with oversize balls can reduce the backlash to less than .001.
I used .1263 balls in the video from toolsupply on Ebay but he now carries .1265 balls.
http://stores.ebay.com/ToolSupply/Ballscrew-balls-/_i.html?_fsub=13610778&_sid=74456173&_trksid=p4634.c0.m322
He also has a website now.
http://bearingballstore.com/ballscrew-balls/cat_1.html?page=1
One other source is Bal-tec.
Follow the wiring instructions for the KBIC controller from CNC4PC.
http://cnc4pc.com/Tech_Docs/KBIC.pdf
1100 Watt Spindle Motor Upgrade
Get a 1.1Kw (1.5 Hp) DC motor for a WMD30V/WMD30LV mill from Weiss Machinery
in China. I contacted them by email on their site and they were very helpful. I paid $220 total with airmail shipping to my front door and had it in 5 days (including the weekend). They were willing to take payment by Paypal thru their partner Rexx Machine. I tried ordering one from Precision Mathews at first for their PM30MV, my email was answered the first day and he gave me a price of around $200. I told him that was good but never heard back again after a few more emails. I then went to Weiss, even though they are half way around the world they responded to every email, even on sunday. They first suggested I try one of their suppliers in Canada as they said shipping from China would be high. I contacted http://www.garantmachinerie.com/ and was given a quote of $317.
I went back to Weiss and they gave me the cost, $95 for the motor and $125 for airmail shipping. They emailed making sure which motor I wanted since I didn't have a serial # to give them to make sure I wanted the 1.1kw DC 110V 60 hz. motor from the MWD30V.
They couldn't take payment by credit card and sent bank tranfer info but I asked about Paypal instead. They didn't have an account with Paypal (they may have it now) so they took my payment thru their partner Rexx Machine. I had the motor 5 days later. It's mounted on the mill with my belt drive as seen in the second video and I have more testing and belt drive options to work thru. I used a KBMM-125 controller for the motor.
Home and Limit Switches
The X and Y axis use small microswitches and the Z axis uses bigger higher quality switches from Real Switch since there is more room for them. All are Normally Closed wired in series with each other. This uses only one input on the BOB and is the safest setup. Any wire breakage will halt the system.
I cut grooves in the saddle and port holes a while ago. Used a 1/4 ball endmill and cut them .060 deep. Put a single port in the center of each dovetail, thru the gib strip too if needed. The rear of the saddle needed a 1/8 inch hole drilled to the center to allow the fitting to mount on the outer edge to avoid hitting the column.
The test for my oiling system pump went well so now I can finish up the details.
Used an auto fuel pump I had laying around for 20 years, knew I'd find a use for it.
It's a 4-7 psi model like this one from JCWhitney.
here's cheaper ones
EMPI Electronic Fuel Pumps for Air-Cooled Volkswagen - JCWhitney
Electric FUEL PUMP - Universal 4-6 psi for VINTAGE cars | eBay
I'm using a very lightweight motor oil, 0W-20 available at most auto stores.
I'm using 1/4 inch Push-to-Connect fittings and clear polyurethane tubing.
I ordered most from Automation Direct and some from Mettle Air on Ebay.
More later.
Oiling System

|
|
saddle oil grooves
|
|

|
|
1/8 hole
|
|

|
|
drill thru inside dovetail tap backside for 8-32 plug
|
|

|
|
drill thru gib strips
|
|

|
|
push to connect fittings
|
|
G0704 LD (Light Duty) Power Drawbar
This drawbar is a revamped version that I designed for the X2 several years ago.
http://www.hossmachine.info/projects_7.html#power%20drawbar
It's basically the same just stretched to fit the head of the G0704. It will use the same belleville spring washers and small air cylinder as before. This design does put the force onto the spindle and bearings but it's only about 750 lbs. It's worked on the X2 with no problems for 4 years now. You'll have to make sure the quill lock is very tight, I removed the stock lock lever on mine and replaced it with a socket screw to allow a bit more tightening force. As the name implies, this is a light duty system. The bellevilles listed will give about 600-700 lbs of holding force for the TTS toolholders. This has worked pretty well for endmills up to 3/8 inch on the X2 as you can see in these videos. I wouldn't recommend trying to use a bigger air cylinder and bellevilles or you'll risk damaging the bearings.
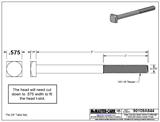
Replace the stock drawbar with the bolt below from McMaster Carr.
Power Drawbar Parts List
8.250 x 6.0 x .250 aluminum plate(2)
6.0 x 4.725 x .375 aluminum plate
4.5 x 1.0 x .1875 steel plate(2)
.750 dia. x 6.0 steel rod (cam,spacers,washers)
.5 x 5.6 bolt(main pin)
.375 x 1.75 bolt (2) pins
.75 x.75 x 1.75 steel (clevis or McMaster Carr #6498K44)
7/16-20 jam nut
3/4-16 jam nut
1/8 cotter pins(3)
1/4-20 x .750 screws(6)
5/16-18 x .750 screws(4)
1.5 inch bore air cylinder, McMaster Carr # 6498K211
1/8 NPT 3-WAY 2-POS 24 VDC SOLENOID AIR VALVE
Spring Washers (4) or at McMaster Carr # 96445K267
Drawbar replacement - Steel Hex Head Cap Screw 7/16"-20
Thread, 8" Part Number: 91257A487 McMaster Carr
1/8-NPT air fittings (3)
1/8-NPT plug fitting
Air line (6ft)
Compressed Air Source (100 PSI)
110 VAC switched source
Source for Metal Stock - Speedy Metals or Online Metals
Most the rest of the parts can be found at Mcmaster Carr or
Check your local hardware store for screws and such.
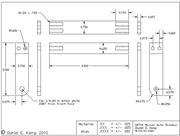
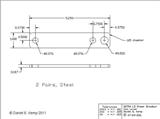
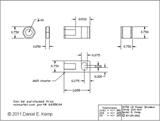
The prints below are for the G0704 LD Power Drawbar. I have not made these parts and cannot guarantee that they will fit the machine perfectly.
If I get feedback, I will update them and add Rev #'s to the prints to show that they have been redrawn. Use at your own risk. Works on paper though.
Click to Enlarge.
|
|
G0704 LD Power Drawbar cam lever
|
|
|
|
G0704 LD Power Drawbar clevis and nut
|
|
|
|
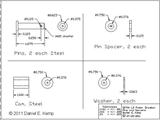
G0704 LD power drawbar pins and spacers
|
|
|
|
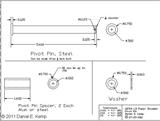
G0704 LD power drawbar pivot pin
|
|
|
|
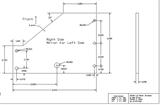
G0704 LD Power Drawbar side plate
|
|
|
|
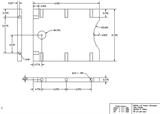
G0704 LD power drawbar top plate
|
|
G0704 LD Power Drawbar Direct Acting
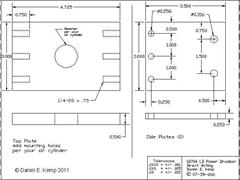
This is a very simple version of the Light Duty power drawbar. It uses the same bellevilles, a stack of 3 pairs ()()(), and the new drawbar bolt listed above. It relies on an air cylinder with a 3.5 inch (90mm) to 4 inch (100mm) bore and a stroke length of less than 1 inch. You only need about 1/4 inch stroke. Note: 3.5 inch bore @ 100 psi = 942 lbs of force, 4 inch bore @ 100 psi = 1237 lbs. These are pretty pricy new but a search on Ebay can usually turn up a suitable candidate for less than $50, try a search for Fabco air cylinders, they are very common as surplus. A part # with 1221 is for a 4 inch pancake model. It's up to you to add the mounting holes in the top plate. Assemble the bellevilles and drawbar and tighten on a collet. Assemble the air cylinder, side and top plates. Use a spacer or washer about 1/16 thick on top of the drawbar and set the assembly on top then mark your 5/16-18 mounting hole locations on the sides of the head. This will leave a good gap between the top of the drawbar and the air cylinder shaft when at rest so they don't rub when the spindle is on. If you get a double acting air cylinder, you'll need a 5 port 4 way solenoid valve. Pneumatic Products on Ebay has plenty to choose from depending on your port size and voltage preference. Some air cylinders will come with a cap nut on the shaft to allow you to adjust the length, you can always buy one at McMaster Carr. This could let you make adjustments later if needed. Set to the center of travel when you mark for your mounting holes.
Aluminum should be fine for construction.
|
|
G0704 LD power drawbar direct acting
|
|
Nordic Track Treadmill Spindle Motor Upgrade
This upgrade uses a Nordic Track treadmill motor that can be found commonly on Ebay. I grabbed a used one but you can also find new ones for less than $150, far less than that too. Make sure to get the same type that has the fan on top as many treadmill motors don't have any fan built in which could lead to overheating. Don't pay attention to peak HP ratings, continuous duty ratings is what's important. You want to be able to run for hours if neccessary and not worry about burning it up. I used the KBMM-125 controller which only needs to be run off of 110 VAC so no need to run a 220 line for it. The KBMM-125 will output 90 VDC, the motor I have has a 1.75 HP continuous duty rating @100 VDC so it gives 1.575 HP at 90 VDC. More than enough. I ran the motor thru the same hogging tests as the 1100 watt motor and it was able to peak at 13 IPM just like the 1100. Test parameters - 1.0 inch DOC, .5 WOC, .500 4 flute HSS rougher, in ally. The Nordic does draw more current as you can see in the video but bear in mind these are EXTREME limits tests taking the motors to 100% load, normal operation is around 25% load.
The 13 IPM tests are running a 6.5 ci MRR, that's a LOT of chips, doubt anyone needs to remove anymore than 2-3 ci day to day. so the draw on the motors will be much less. Since this motor is about 5 lbs lighter and gives about 1200 rpm more than the 1100 watt motor, I'll be using it for the time being.
The motor weights.
Stock 600 watt motor = 9 lbs. 6 oz.
Nordic Track motor = 9 lbs. 8 oz.
1100 watt motor = 14 lbs. 10 oz.
I made the motor mount on the left. It uses the same motor base as the stock 600 watt motor and an ally sleeve bolted to it. The sleeve was only $5 worth of 3.25 x 3.75 x 3.0 long ally tubing from Speedy Metals. The bore only needs opened up about .015. The prints are included with the Belt Drive Plans.
I used the same KBMM-125 controller as with the 1100 watt motor. The red and black wires are + and -, the 2 blue wires are for the thermal switch inside. I cut the wires off but you can connect the blue wires in series with one of the motor leads to make use of it, it will shut off if it overtemps.
A good read here. The good thing about this treadmill motor is it's reversible, some motors have brushes at an angle and don't reverse well.
Click to Enlarge
I used a pair of these small indicators from Discount Machine an outlet for Shars.com #303-3101
Warning! Attempt at your own risk. Cranking the pots to the max can overtax your motor. Though not specific to the G0704 controller, be sure to check the guidelines in the Optimum User Manual for reference or the KB manuals for more adjustment techniques. http://www.kbelectronics.com/manuals/kbic_manual.pdf
|
|
Click to Enlarge
|
|
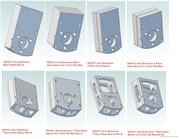
I have created several new versions of my original Head Spacers.
You can download them for free by request at hoss@g0704.com.
You will receive information on where to download the .zip file and the required password.
Files include .sldprt format for the 3D models, .dxf and .jpg for the blueprints and .txt files that include instructions and part lists.
.jpg)
.jpg)


