

Frequently Asked Questions
1. The question I get most is along the lines of "Why did you CNC/get the G0704 when you already have the RF45?
A. I got the RF45 (ZX45) first as an upgrade to the X2 to have a mill that could hog aluminum and cut steel much better than the X2 could. A couple months later, Grizzly started selling the G0704, a BF20 type mill that I've always heard good things about.
They have been sold in Asia and Europe and a couple places over here but usually with an MT2 or MT3 spindle. I prefer R8 being that's what I've used for decades and have lots of R8 tooling. Lathemaster did have the only US R8 version of the BF20 at the time and I was going back and forth between it and the RF45. DIdn't get it because their price was only a few hundred less than the RF45 and as is still common, they were out of stock.
I thought I couldn't wait so I went for the RF45 that I found in stock at Wholesale Tool (11/2009).
When Grizzly came out with the G0704 (Jan/2010) it was only $950 with a stand so I had to jump on it. Some deals are too good to pass up. If only I would have been a little more patient
I could have saved myself a LOT of hassle in getting the RF45 into the basement. The RF45 is a good mill but there has been nothing I've done yet that needed the extra weight carrying ability
of the RF45, no engine blocks and such. Everything I've made from aluminum or steel has been done equally as well on the G0704. I'm glad I didn't rush into buying CNC conversion parts for the RF45 because I see no benefit in CNCing now. The G0704 conversion costs about half of what the RF45 would. If I had a garage I would have bought a used Bridgeport kneemill to have a brute for the occasional heavy duty manual milling job or to make the column mods to the G0704 easier. That's the role the RF45 is taking now. Collecting dust till the BIG job comes along, someday, maybe. The G0704 will be busy with the other 99.99%. Not going to spend
$2-3000 CNCing the RF45 for .01% of the work that I may never need.
2. I removed the 2 bolts attaching the head but I can't seem to be able to remove the head?
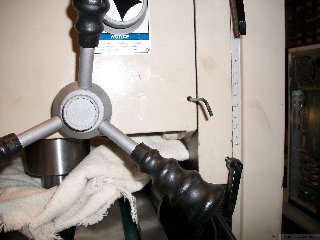
There is a little hole on the right side of the head near the slide that has a setscrew (maybe 2)
Back them out a bit and the head will slide out, the setscrew goes into a groove in the hub
on the slide to prevent it from sliding out while the head rotates. Note: Run the Z down till the
head touches the table (use cardboard to protect the table) and crank the Y axis handle to help
slide the head on and off the hub.
3. What are the 2 T-bolts in the toolbox for?
The manual claims they are for vise holding but they don't fit the slots in the table very well at all. What we have found though is they are just about perfect for using instead as the t-bolts in the
3-bolt head mod.
4. My mill came with an oil sight glass in the head, there is nothing in the manual about it.
Do I need to add oil?
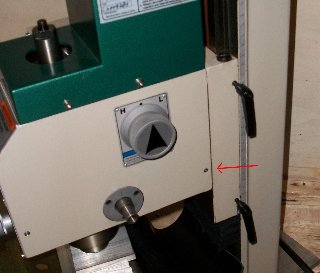
They started shipping mills with that sight glass last year. You can see in the pic above my earlier model doesn't have one to the left of the hi/low knob. These heads, at least at the time of this writing (02/12) aren't capable of holding oil. Besides, there isn't an oil fill or drain port.
5. I have a tool in the toolbox that looks like a punch, what's it purpose?
They recently started including that pin spanner wrench after many complaints about the drawbar and it's retainer cup system that doesn't work very well (the cup could come loose
while you were trying to snug the drawbar) There should be a small hole in the outside of the spindle now about a 1/2 inch up from the face where you can insert the spanner. You can hold the spindle from turning with one hand and loosen/tighten the drawbar with the other. This is a mod that I did to my mill early on and it works very well. See it here, Spindle Spanner Wrench.
6. Motors won't turn.
There are several common errors that can cause your stepper motors to not turn when you hook up your electronics. The following are some easy fixes to check for.
A. The dip switches on the drivers are incorrectly set. For my recommended 570 oz/in N23 steppers X,Y,Z and the 906 oz/in N34 for the Z (8070D) and 1/8 microstepping, set switches to..
6050 5056/D 8070D
1. off off off
2. off on on
3. off on on
4. off off off
5. on off off
6. off off off
7. on on on
8. on on on
B. When using the C10 breakout board and Automation Techs wiring diagram, many forget to put the COM jumper on the 5V pins.
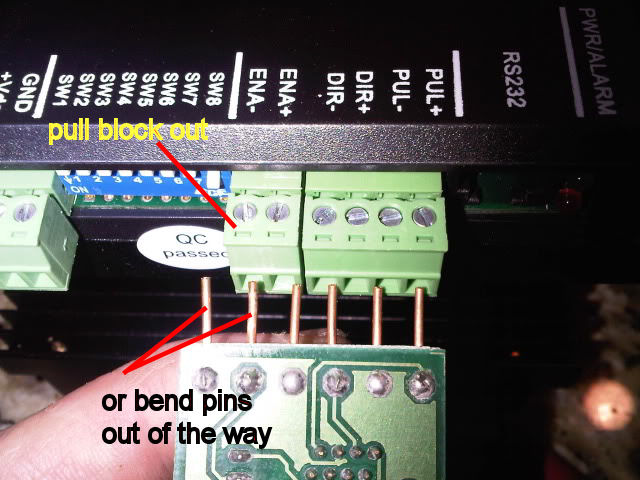
C. Automation Techs drivers don't use the ENA+/- pins so don't connect them. If you are using the C35 breakout board do as in the pic.
D. Use the correct parallel cable, the ones sold by Cnc4pc or AT are the correct type that are parallel port extension cables.
E. Run the drivers test found in the Mach 3 folder. If your PC is newer the parallel port might not be up to the task and performance will suffer greatly. In that case consider getting an Ethernet Smoothstepper to avoid the parallel port all together and boost performance.
http://warp9td.com/
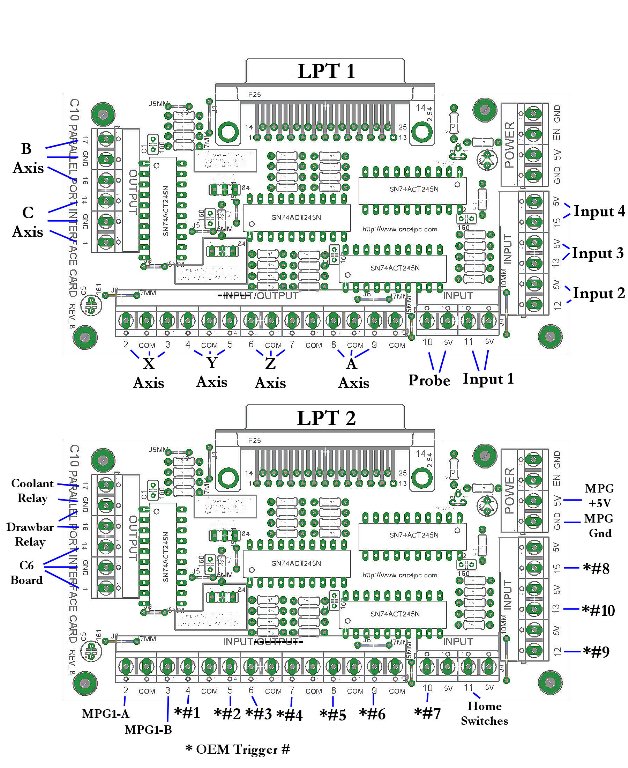
F. Make sure Mach 3's Ports and Pins in Motor Outputs match what pins the drivers are connected to. Below is how I had my (2) C10 boards wired.
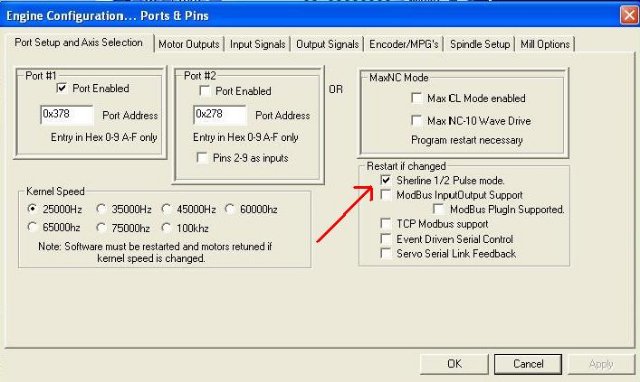
G. Make sure to check the box for "Sherline 1/2 Pulse Mode" under Ports and Pins.
7. Can I call you?
Sorry but I don't give out my cell number, please email me with any questions.
I can answer emails with much more information including pictures, links and attachments if needed.
8. Will the G0704 ballscrews and nuts sold by Automation Tech work with your plans?
Yes they will. Automation Tech is now offering the machined C7 ballscrews and nuts for my
Phase II CNC Conversion.
9. Can I keep the handwheels for manual operation?
Many think they want to keep them so they can still do manual milling. Many also find out that
once you have the mill CNCed that using the jog buttons, joystick, MDI input, Wizards, MPG or a pendant to be a much easier, accurate and pleasant way to do "manual" milling. It's easier to hold a button down than crank away at the handles. With step mode you can position the tool in as little
as .0001 increments. You can set the feed and get a smoother finish than you could by hand. You can push a button and rapid the axis much faster than by hand. There are a few other things to consider if you change to ballscrews and want to hand crank. Ballscrews have much less friction
than the stock leadscrews, this can allow the cutter to be pulled into the work especially during climb milling unless you ride the locks and even then it can. Ballscrews have lower pitches typically than the stock screws so the graduations on the wheels won't match or be as precise. The stock Y axis leadscrew is typically left hand threaded but the ballscrews used are typically right handed so cranking the Y axis by hand would be opposite of normal.
10. Why do these mills come with such low spindle speeds?
Because they are manual milling machines. The real limiting factor is how fast you can comfortably crank the axis handles. Most manual mills have finer pitch leadscrews than you would find on a ballscrew CNC machine so basically you can't crank fast enough to need higher spindle rpm to maintain a proper chip load on the cutter. Unless you want to run cutters smaller than 1/8 inch, the rpm range of many of these mills, 2000-3000 is plenty fast for manual cranking and that's for aluminum, cut steel and you need even less rpm. Convert to CNC though and a Belt Drive to boost spindle rpm really becomes beneficial to take advantage of the faster cutting speeds attainable.
.jpg)
.jpg)


